WORKSHOPS
Montana
Yep, we moved back home to Montana in 2015!!! We’re in the Mission Valley, 45 miles north of Missoula on the Flathead Indian Reservation. We made it back home without being in a coffee pot like Shoni’s Uncle Pat.
Quickly Advance Your Skills
Hitched horsehair gives you infinitely more possibilities to use your creativity.
We teach workshops on how to hitch horsehair, available for up to two people at a time. Three day beginning workshops are $600.00 per student. The days are the best three days that fit both your schedule and ours, preferably Monday through Friday.
The butterflies on our Mariposa Lapwai headstall won’t be your starting project in workshops. But the workshop gets you going quicker than if you learn on your own. We put you on a student hitching jig which Ron built, and supply the pulls for your projects. You don’t need a jig to learn how to hitch. But the jig holds the dowel and provides string tension. So you’re not trying to do all that and learn how to hitch at the same time.
Photos of our student jig and my free-standing jig will be in the Photo Gallery and in this area once we find them in storage. Our jigs have a foot operated pedal which controls the gear reduction motor that has a keyless chuck which holds the dowel you hitch over.
These classes are tailored to your specific needs. We cover much of the first book in beginner workshops because students advance so quickly with this individualized attention. How to use graph paper is always covered in each workshop. Keep reading on this page to see photos of key fobs made in the beginner workshop.
The workshop price does not include books. We suggest that beginners purchase our first book, Hitched Horsehair: The Complete Guide for Self-Learning, before coming to the workshop. This familiarizes you with terminology.
If you are advanced with your hitching, we start where you are – whether you are “stuck” with something. Or feel you want additional help with advancing. These workshops may be less than three days.
The important thing is these workshops are tailored to what you want to learn or need to learn. To have fun with hitching and take it to the next level.
The workshops start about 9:00 a.m. when you wander in with your cup of coffee. They go till 5:30 p.m. Lunch is provided because we don’t want you to get away….. Ron cooks better than Shoni.
We will exhaust you with hitched horsehair in these three days.
Travel to Saint Ignatius, Montana, for these workshops. We are 45 miles north of Missoula, Montana. Motels and private campgrounds are in the area.
It is best if you come to us. We have show and tell, from finished product to experiments to “this and that”. The “this and that” helps tremendously in teaching you. All this is difficult to travel with.
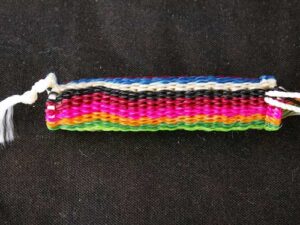
Key Fob First Project
This key fob is Day 1 of the three day beginner workshop. You learn how to do the open hitch knot and closed hitch knot. These are the only two knots that form all the intricate patterns. Tie on various colored pulls to see how the open hitch knot and closed hitch knot look. The open hitch knot swirls away from you. The closed hitch knot swirls towards you. Straight lines are created by hitching all one row of open hitch knots; then all one row of closed hitch knots. Alternate the rows for the straight look, used in belts, hatbands, etc., where you do not want swirl.
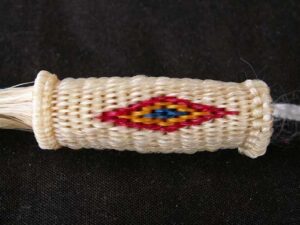
6 Row Diamond Key Fob
The 6 row diamond key fob is Day 2 of the 3 day workshop for beginners, with the addition of the cross hitch border (not shown in the photo). Advanced students may want this project included in their workshop. It takes 13 rows to hitch the 6 row diamond. There are 6 pulls across in the diamond apex which is where the name comes from. Students learn how to drop and add pulls.
Needle knots are also taught. They are both decorative and functional. Put a needle knot on the end of your newly hitched key fob.
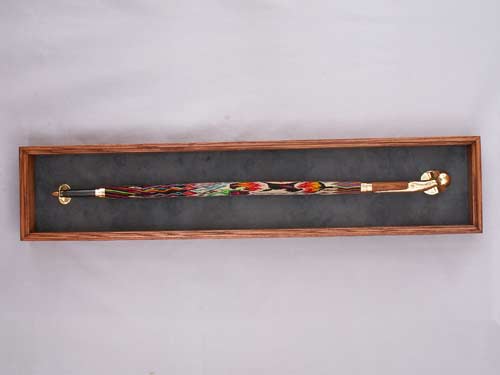
This photo does not show a close-up of hitching on a dowel. Instead it’s of the finished product. See the Photo Gallery or Hitching Tips page for the correct photo. Sometime we’ll figure out how to insert the correct photo. Luckily we know how to hitch better than do computer stuff. Your first project isn’t this complex, but know that with your new passion and determination, you’ll reach this level.
Note that hitched horsehair is not the same as braided horsehair. Hitched horsehair is a series of knots with horse tail hair. Braiding is…..think of a girl’s braided hair. Hitched horsehair lasts for generations. Braiding does not have the same lasting stability.
Who hitches horsehair?
Our workshop students have included: veterinarians, hair dresser, demolition deep sea diver, avocado farmer, Harley biker, opera singer, nuclear power plant radiation test screener, nurse, TV camerawoman, wine taster/martial artist, accountant, caregivers, retired rancher, welding consultant for oil companies. Sam Henderson was 76 years old when he learned how to hitch from the rough draft of our first book. This lists just a few.
One of our workshop students has taught hitched horsehair to high school students in their art class. Some of these students used hitched horsehair for their senior project, a requirement for graduation. His students like it and hate it for the same reasons: challenging, not simple, hard and time consuming, complicated, rewarding.
Leaders of 4-H are teaching it, using our books. One college student wrote a how-to booklet for her creative writing class. The Europeans have taken it on big time. Today there are more people hitching than ever before, on a world-wide basis. Our books have sold in 23 countries that we know of.
Technical Advisers
From 2012 through 2015, we were technical advisers for the book, Horsehair Bridles: A Unique American Folk Art, by Ned and Jody Martin. It was published in 2016.